Internet Connection Sharing on Windows XP
This trick shows you how to share your internet connections on multiple computers within a workgroup with Windows XP. Windows XP has a built-in feature that called "Internet Connection Sharing" (ICS) that allows home users to share their internet connections on multiple computers.
If you are not familiar with the network configurations, the easiest way ...to share your internet connection is to purchase a router or hub. Use this trick only if you don't have a router, or don't want to use a router, or if you just want to try out the feature.
A simple way to understand this feature is, you are making your host computer (the computer directly connects to the internet) functioning as a router for other computers.
This trick shows you how to share your internet connections on multiple computers within a workgroup with Windows XP. Windows XP has a built-in feature that called "Internet Connection Sharing" (ICS) that allows home users to share their internet connections on multiple computers.
If you are not familiar with the network configurations, the easiest way ...to share your internet connection is to purchase a router or hub. Use this trick only if you don't have a router, or don't want to use a router, or if you just want to try out the feature.
A simple way to understand this feature is, you are making your host computer (the computer directly connects to the internet) functioning as a router for other computers.
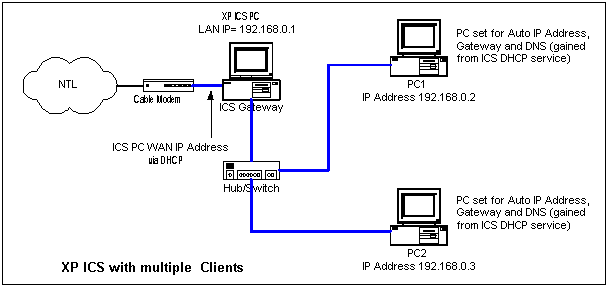
What do you need?
•A "Host" computer that running Windows XP. This computer must have at least TWO (2) network adapters. One adapter - let's call it "Adapter #1" - connects to the internet and another, "Adapter #2", connects to a hub or directly to other computers.
•Client computer(s), which run any version of Windows. A client computer can be connected to the host computer directly by a cross-over cable or indirectly through a hub.
•This trick assumes that the host computer is connected to the internet and you are able to access the internet on this computer.
Configure the Host Computer
1.Logon the host computer as Administrator.
2.Click Start >> Control Panel.
3.Click Network and Internet Connections.
4.Click Network Connections.
5.Right-click the connection that you use to connect to the internet (the connection with Adapter #1). This connection can be either a high-speed internet connection or a dial-up connection.
6.Click Properties.
7.Click Advanced tab.
8.Under Internet Connection Sharing, select the Allow other network users to connect through this computer's Internet connection check box.
9.If you are sharing a dial-up Internet connection, select the Establish a dial-up connection whenever a computer on my network attempts to access the Internet check box if you want to permit your computer to automatically connect to the Internet.
10.Click OK. You'll receive the following message:
When Internet Connection Sharing is enabled, your LAN adapter will be set to use IP address 192.168.0.1. Your computer may lose connectivity with other computers on your network. If these other computers have static IP addresses, it is a good idea to set them to obtain their IP addresses automatically. Are you sure you want to enable Internet Connection Sharing?
11.Click Yes.

Configure the Client Computer(s)
To use the shared connection from the Host computer, a client computer must be configured with "Automatic IP address". The main configurations are:
1.Configure TCP/IP Automatic IP
2.Configure Internet Connection
The steps for the above two configurations are vary on different versions of Windows.
The following procedures are for Windows XP client computers.
1. Log on to the client computer as Administrator or as Owner.
2. Click Start >> Control Panel.
3. Click Network and Internet Connections.
4. Click Network Connections.
5. Right-click Local Area Connection, and then click Properties.
6. Click the General tab, click Internet Protocol (TCP/IP) in the This connection uses the following items list, and then click Properties.
7. In the Internet Protocol (TCP/IP) Properties dialog box, click Obtain an IP address automatically (if it is not already selected), and then click OK.
8.Click Start >> Control Panel
9.Click Network and Internet Connections.
10.Click Internet Options.
11.In the Internet Properties dialog box, click the Connections tab.
12.Click the Setup button. The New Connection Wizard starts.
13.On the Welcome to the New Connection Wizard page, click Next.
14.Click Connect to the Internet, and then click Next.
15.Click Set up my connection manually, and then click Next.
16.Click Connect using a broadband connection that is always on, and then click Next.
17.On the Completing the New Connection Wizard page, click Finish.
18.Exit Control Panel and test the internet. You might need to restart the computer.
To use the shared connection from the Host computer, a client computer must be configured with "Automatic IP address". The main configurations are:
1.Configure TCP/IP Automatic IP
2.Configure Internet Connection
The steps for the above two configurations are vary on different versions of Windows.
The following procedures are for Windows XP client computers.
1. Log on to the client computer as Administrator or as Owner.
2. Click Start >> Control Panel.
3. Click Network and Internet Connections.
4. Click Network Connections.
5. Right-click Local Area Connection, and then click Properties.
6. Click the General tab, click Internet Protocol (TCP/IP) in the This connection uses the following items list, and then click Properties.
7. In the Internet Protocol (TCP/IP) Properties dialog box, click Obtain an IP address automatically (if it is not already selected), and then click OK.
8.Click Start >> Control Panel
9.Click Network and Internet Connections.
10.Click Internet Options.
11.In the Internet Properties dialog box, click the Connections tab.
12.Click the Setup button. The New Connection Wizard starts.
13.On the Welcome to the New Connection Wizard page, click Next.
14.Click Connect to the Internet, and then click Next.
15.Click Set up my connection manually, and then click Next.
16.Click Connect using a broadband connection that is always on, and then click Next.
17.On the Completing the New Connection Wizard page, click Finish.
18.Exit Control Panel and test the internet. You might need to restart the computer.
Comments